Showing posts with label Sewing. Show all posts

Monday, March 30, 2020

Fabric masks in the time of coronavirus - video tutorial

Please see this video tutorial on how to make the best* fabric masks and how to properly wear it and take it off. Let me know if you have questions.


Here is the location of the different steps in the video: Fabric selection - 1:50 Pattern description - 5:25 Sewing the pattern - 10:45 Making bias tape - 21:10 Adding nose wire - 25:10 Sewing the edge - 29:39 Properly put on/remove the mask - 37:13 Washing instructions - 41:19


I will try to get a written step-by-step tutorial on this website soon. Stay tuned!

* my evidence-based opinion (I am a PhD-packing microbiologist at Stanford).

Thursday, March 19, 2020

Masks in the time of Coronavirus

Let's talk masks for a second. First of all, I am a PhD-packing microbiologist at Stanford and I consulted with a Stanford nurse regarding the fabric masks.
Image result for n95 mask
N95 mask - can protect against coronavirus if worn properly
SAVE THESE FOR OUR HEALTHCARE WORKERS!
The first picture is an example of an n95 mask. These are the only masks that can prevent you from breathing viral particles. It blocks 95% of very tiny particles. It only works when worn correctly when it forms a seal around your face. Healthcare workers need these and they are in short supply and quickly running out.
Image result for surgical mask
Surgical mask - will NOT prevent infection,
but helps limit spread of germs if wearer is sick.
Healthcare institutions in the US are also running out of these.
The second photo is a disposable surgical mask. If you are sick, these help stopping the spread of virus particles and bacteria (when you cough or sneeze, this mask will trap the particles). They also need to be worn properly, and are meant to be thrown away after use. IMPORTANT: these masks will NOT prevent your from catching novel coronavirus. The WILL limit the spread of novel coronavirus if you are infected.
The third photo is an example of a fabric mask. This mask operates under the same principles of the surgical mask and can help keep you from infecting others if you are sick (or an asymptomatic carrier of novel coronavirus). It is likely not as good as the surgical mask at absorbing particles you exhale, but it will do some good. IMPORTANT: these masks will NOT prevent your from catching novel coronavirus. The WILL limit the spread of novel coronavirus if you are infected. They NEED to be washed with soap and hot water after every use or virion particles can remain active. The more layers of fabric, the more particles are likely to get stopped. Crochet masks have lots of holes where particles can get though, so I'd recommend a fabric mask that you wash regularly if you go this route.
Extra benefit of wearing a fabric mask: people are more likely to keep the recommended 6 feet distance from you. ðŸ˜·
Image may contain: text
Example homemade mask. Will NOT prevent infection,
but offers some benefits of surgical mask, with the additional benefit that
people will stay the f*ck away from you in public
MYTH: Masks are not a 'breeding ground' for the novel coronavirus. Viruses are not 'alive' on their own, although they can remain active in the air for a few hours and on surfaces for a few days. They need their hosts (humans for novel coronavirus) in order to replicate and spread. So, yeah, social distance it up!
Let's do our best to stop helping the virus spread! Now is the time to shelter in place as much as humanly possible. I am hunkering down for a month and then I will re-evaluate the situation and see. We need to all do whatever we can.

FYI: I have made this post public on my personal Facebook page (Heidi Arjes) - please ask any questions thre or in the comment box below. 


Thursday, April 13, 2017

Resistor Headband DIY from T-shirt

There is only one week before the March for Science (it is on April 22, 2017) and if you are looking for a quick and easy design to make and wear in solidarity with Project Thinking Cap, this could be just the solution for you. Also, it is environmentally friendly, as you can upcycle an old T-shirt into a fabric headband. You can use acrylic paint or fabric paint to add on a design.

To learn more about my scientific research, why I am marching, and the Resistor Knit Hat I designed, check out this blog post: Resistor Knit Hat - March for Science.

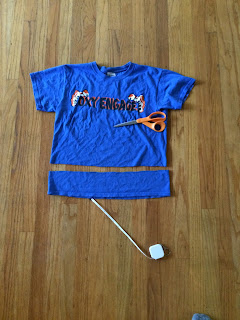
Step 1. Find a T-shirt - I did not want to part with any of my blue or green T-shirts so I found one at a garage sale for $1. :)

2. Cut T-shirt ~3 inches from bottom

3. Cut bottom seam from the strip.

4. Option 1: Cut the T-shirt so that it is ~1-2 inches shorter than the diameter of your head 
(mine is folded in half and was made for a 24 inch hat brim). 
Option 2 (not pictured): leave T-shirt strip original diameter, but cut to open up the strip. This will make a long strip of T-shirt that can be tied around your head ninja style. :)

5. Assemble paint - I used a white acrylic paint for the design. You can also use fabric paint (the puffy paint type). Tug the fabric a little laterally so that you can see which side of the fabric naturally folds under. You will want to paint on the side that does not fold under (so your head can keep the fabric flat). I am having trouble explaining this, so comment if it seems unclear. For my T-shirt, I ended up painting on the side that originally was the interior of the shirt.

6. Paint on desired design. I used a design showing a circuit with the symbols for a battery and two resistors.

 7. Let paint dry, then fold in half with the painted side in. Seam the edge with a sewing machine or by hand using a whip stitch.

Friday, March 10, 2017

Fabric Resistor Headbands - Make your own for the March for Science

These Resistor Headbands are perfect for working out. They are made of a quick-dry polyester knit fabric and are very light-weight and comfortable.

Purchase the fabric here via Spoonflower! If you order today, March 10th, Spoonflower is offering free shipping! The printing/shipping process usually takes about 3 weeks, so order now to have these ready to go by the March for Science.

Make sure to choose "Performance Knit" as your fabric. 1 yard will make 20 seamed headbands and 3 tie-in-the-back headbands. Contact me if you would like to see other designs!

https://www.spoonflower.com/designs/6167508-resistor-workout-headbands-march-science-by-hidkid?view=for_sale

The instructions are in the image below. Click here for a printer-friendly pdf. :)


Monday, November 3, 2014

Jeans to Aprons Upcycle

A while ago, I upcycled a pair of purple pants and denim jeans into some awesome aprons that I can wear when I paint, or much more rarely, when I cook. This project was fun and easy and they would make great gifts (friends and family - holler if you want one for Christmas)! I followed the awesome tutorial here. Then I went and convinced Pablo Tsukayama to take some great pictures of me. :)


Thursday, October 9, 2014

T-shirt Lining for Knit Hats Tutorial

 I love knitting hats. There is nothing like the feeling of accomplishment and joy I have when finishing a hat and wearing it with pride. However, on the super cold and windy days, I often opt for a store bought hat, simply because it has a fleece lining and keeps my ears warm.

I solved this problem last year by designing a lining for my bulky hat with earflaps. Best of all, this lining is made out of stretchy knit T-shirt material, so it should fit most hats and heads (and provide yet another way to reuse old T-shirts - other T-shirt projects seen here, here, and here).


Directions:

  1. Cut your T-shirt under the sleeves as shown. Then cut up the side so that you have one long rectangle of material.
  2. Lay your hat along the bottom of the shirt material. Begin cutting, using the hat as a pattern as shown.
  3. Flip your hat over onto the material and continue cutting. 
  4. Fold the cut portion of the T-shirt material in half. Using the hat as a pattern, trim the top so that the material forms a semi-circle.
  5. Line the material up, you should have two layers of material.
  6. Sew a seam along the material, allowing ~1.5 inches for the seam.
  7. Try on the lining to make sure it fits your head. If necessary, trim it a bit from the base.
  8. Sew the lining to the hat interior  ~1 inch from the brim of the hat. Also secure the top of the knit hat to the top of the lining at this point.
  9. Cut two triangle shapes and sew them to the inside of the flaps as shown.
Enjoy your warm homemade hat!


Tuesday, July 9, 2013

Knitting needle organizer


So, I have a lot of knitting needles. To keep them organized, I made this organizer out of some spare fabric. I first hemmed all the edges (if I were doing it again, I would have first cut off the white stripe, but since I was going for functionality and not for looks, I think it is okay). I then folded one end up ~5 inches and sewed along the sides. To hold the needles in, I sewed lines ~1 inch apart, making sure I had enough for all my needles.

To support the tall needles, I hand sewed ribbon near the top.

To easily identify the circular needles, I made them "name cards."

I keep the "name card" of the needles currently in use on a yarn needle that I store on the back of the organizer - so I don't lose those pesky little things!


I attached some ribbon to the top corners so that I could hang the organizer on the wall

A space for everything!

Tuesday, April 23, 2013

Fluffy Tutus for girls and teddy bears


I always like to make unique and quality gifts for my nieces.  I really enjoy putting the effort into the project and seeing their faces when they open up their gifts.  For my nieces' birthdays this year (Taryn is 5 and Audra is 3!), I made tutus and matching tutu teddy bears.  My oldest niece Taryn (who I knitted this elmo hat for when she turned 2) almost replaced her regular stuffed dog that she sleeps with every night with the tutu bear.  I will consider that a success!  :)

I previously made my niece Carleigh and myself matching pink tutu's.  I wore mine to the Halloween kickball game.  It turns out that you are never too old to dress up as a ballerina princess (or play kickball).  I based the tutu's for the girls on this tutorial.  Instead of buying the rolls of tulle, I bought 5 yards of tulle (this was enough for a little girl tutu and a bear tutu) but I could have bought even more to make the tutu's fluffier.  I cut the tulle fabric in half along the crease to give me two 27 inch high by 5 yard wide pieces of tulle.  I then cut about 10 inches of tulle off of one end and set it aside for the bear's tutu (~10" by 27" piece).

To make the tutu, I gathered one of the 27" by 5 yard pieces of fabric, folded about one yard of it in half lengthwise.  I cut a piece of 3/4" wide elastic to ~16" in length (~4 inches shorter than the girls' waist unstretched).  I then affixed a large safety pin to one end of the elastic, inserted the elastic into the fold of the tulle, and sewed in a straight stitch along the elastic.  When I reached the end of the elastic, I lifted my presser foot and, without cutting the thread, scrunched the tulle toward the end of the elastic with the safety pin.  The safety pin should hold the tulle in place.  When it is fully scrunched, replace the tulle into the sewing machine where you left off sewing, and continue sewing along the fold until you come to the end of the elastic.  Repeat the scrunching and sewing process and add the second piece of tulle once the first one is finished.  When you come to the end of the second piece of tulle, reverse sew to secure the stitch and cut the thread.  Sew the elastic band together using a zig-zag stitch with ~1" overlap.  Voila - you have a tutu!


To make the bear tutu, I repeated the process for the girl's tutu, but with the smaller tulle that I saved earler.  I used a scrap piece of tulle to make the bow and I sewed the bow in front of the bear's ear.

I found the bears at Wal-Mart for ~5 dollars apiece the tulle at Joann for ~2 dollars a yard.  This project is a super cute and super affordable to show your love for your favorite little girls (or big girls too!)


Sunday, March 24, 2013

Amy Pond Police Outfit

Me as Amy Pond (left) and Karen Gillan as Amy Pond (right) 

Inspiration: Doctor Who, of course!  Amy Pond is my favorite Doctor Who companion (Donna being a close second). Dr. Who has also inspired me to create tutorials for The Exploding TARDIS and TARDIS Legwarmers here on Craftimism.
Two of my friends and I decided to dress up as characters from Doctor Who for St. Louis's Comic Con this past weekend.  I may have been one of the least nerdy people there. I didn't get many of the references or recognize a lot of the people who were dressed up (or even some of the celebrities), but it was so much fun to go in costume.  I feel like that is the only way to go to a comic con!  I felt like a celebrity the entire day, as we had a ton of people stop to take pictures of us.  It was so much fun!

I transformed myself into Amy Pond by assembling the outfit.  I had a white button up shirt and black belt, sewed the skirt, vest, and scarf, and found all the accessories at the dollar store.  I am a novice sewer and was happy with the results.  Keep reading for details on how to make the outfit and where to find the accessories and to see more awesome pictures of our comic con adventure.  

Amy Pond Police Outfit essentials:
  • White button up collared shirt
  • Vest (I made mine from a black T-shirt
  • Skirt - made from knit material, can reuse a T-shirt or buy knit fabric
  • Scarf - Sewn from fabric (I found the fabric square at JoAnn) and a black strip of T-shirt material
  • Black Belt - Mine wasn't quite right, but I went with it :)
  • Accessories - handcuffs and cell phone case for the belt (found at Dollar Tree for $1 each), police radio (I could not find one, so I omitted it)
  • Hair spray color/hair dye (unless you are naturally red headed)


Half Red
Hair - I was thinking about doing a temporary hair color (I think you can get ones that wash out in a few months), but I could not find what I was looking for at Wal-mart or Walgreens.  Instead, I used my dollar tree clearance spray on hair color that had been in my Halloween box for years.  I have naturally sandy blonde hair and I was worried the color would be bright red, but it turned out more natural than I expected, and best of all, it washed out in ~5 shampoos.  The directions said not to use on hair that had been highlighted in the previous year.  I highlighted my hair for my Halloween outfit in October, and it did not wash out as easily from those sections of my hair, but it did eventually wash out (thank goodness!).  I put the color in 1 section at a time and combed it through with a wide toothed comb.  I also sprayed it on my hand and rubbed it through my hair as well.  I rubbed a small amount on my eyebrows.  Then I had to wipe of the excess staining on my forehead with soap and water.  My sink looked like a crime scene by the time I was done. :)

Skirt - To make the skirt, I used a polyester/cotton knit material.  You could easily recycle a black T-shirt.  Follow the diagram below to make a custom miniskirt.

Vest - Follow the instructions below to make a vest from a T-Shirt.  If you are a more advanced sewer and want to create a more accurate police vest, check out this blog post.  

Scarf - I cut a rectangle of the checkered fabric, folded it in half, scrunched it up a little bit and sewed a seam about 1 inch below the fold.  I cut a strip of leftover T-shirt material and threaded it through the seam so I could tie on the scarf.
The Doctor, Amy, and Rory - At the beginning of the day 
At the Doctor Who booth.  We felt at home there. :)

Family Photo!  We found River!

A different Doctor with the Ponds

We found more of the Doctor Who gang!  Captain Jack, Rose, Donna, the 10th Doctor, Amy, and the 11th Doctor - Don't Blink!

Police Amy and action figure Amy :) At the end of the day.

Wednesday, October 31, 2012

How to Make Easy Care Bear Costumes


 Happy Halloween!  As my treat to you, I will share instructions for how to make the Care Bear costumes my friends and I made for Halloween last year.  Kudos to all the guys for being the manliest Care Bears ever!  I still can't believe they agreed to be Care Bears!  And Erica for being a super cute girly Care Bear!
Making this costume is super easy!  All you need is a very small amount of felt or plush material for the ears and tail, headbands (I think a pack of 6 was around $2 at Wal-Mart), a needle and thread, something to stuff the ears and tails, and paper and markers to make the belly badges.  We were green with this project and reused grocery bags to stuff the ears and tails.

For a general pattern for the ears and tail, click here.  To make one ear, cut out 2 U-shaped pieces of fabric a little larger than the size you want the ears to be and sew them together around the edges, leaving the base of the ear open.  Flip this inside out so the seam is moved to the inside of the ear.  Then shove a few grocery bags into the ear, and sew the base of the onto the headband.  Repeat for the second ear.

There are two ways to make the tail, first you could follow the same directions as the ear to make a U-shaped tail and stuff it with grocery bags.   Another way is to cut out a circle about 10 inches in diameter, pack grocery bags into a baseball like shape, and sew the circle closed around the grocery bags, creating a pouch-like tail.  The tails can be attached to your pants using safety pins.

Finally, you can use whatever artistic talents you have to color your belly badge.  You can use the original care bears or be creative and make up your own.  We also attached the badges with safety pins.  The badges were not meant to last forever, and if you use this costume multiple times, you will probably need to remake the badges.  Care Bear Power!!!