Showing posts with label DIY. Show all posts

Thursday, April 13, 2017

Resistor Headband DIY from T-shirt

There is only one week before the March for Science (it is on April 22, 2017) and if you are looking for a quick and easy design to make and wear in solidarity with Project Thinking Cap, this could be just the solution for you. Also, it is environmentally friendly, as you can upcycle an old T-shirt into a fabric headband. You can use acrylic paint or fabric paint to add on a design.

To learn more about my scientific research, why I am marching, and the Resistor Knit Hat I designed, check out this blog post: Resistor Knit Hat - March for Science.

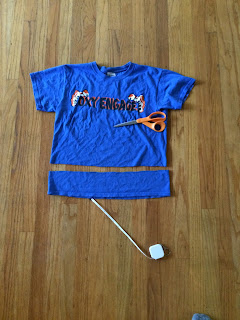
Step 1. Find a T-shirt - I did not want to part with any of my blue or green T-shirts so I found one at a garage sale for $1. :)

2. Cut T-shirt ~3 inches from bottom

3. Cut bottom seam from the strip.

4. Option 1: Cut the T-shirt so that it is ~1-2 inches shorter than the diameter of your head 
(mine is folded in half and was made for a 24 inch hat brim). 
Option 2 (not pictured): leave T-shirt strip original diameter, but cut to open up the strip. This will make a long strip of T-shirt that can be tied around your head ninja style. :)

5. Assemble paint - I used a white acrylic paint for the design. You can also use fabric paint (the puffy paint type). Tug the fabric a little laterally so that you can see which side of the fabric naturally folds under. You will want to paint on the side that does not fold under (so your head can keep the fabric flat). I am having trouble explaining this, so comment if it seems unclear. For my T-shirt, I ended up painting on the side that originally was the interior of the shirt.

6. Paint on desired design. I used a design showing a circuit with the symbols for a battery and two resistors.

 7. Let paint dry, then fold in half with the painted side in. Seam the edge with a sewing machine or by hand using a whip stitch.

Friday, March 10, 2017

Fabric Resistor Headbands - Make your own for the March for Science

These Resistor Headbands are perfect for working out. They are made of a quick-dry polyester knit fabric and are very light-weight and comfortable.

Purchase the fabric here via Spoonflower! If you order today, March 10th, Spoonflower is offering free shipping! The printing/shipping process usually takes about 3 weeks, so order now to have these ready to go by the March for Science.

Make sure to choose "Performance Knit" as your fabric. 1 yard will make 20 seamed headbands and 3 tie-in-the-back headbands. Contact me if you would like to see other designs!

https://www.spoonflower.com/designs/6167508-resistor-workout-headbands-march-science-by-hidkid?view=for_sale

The instructions are in the image below. Click here for a printer-friendly pdf. :)


Friday, May 15, 2015

Knit ottoman cover


My awesome friends Kyle and Diana asked me to make a knit pouf for their baby's nursery. I first designed the base out of cardboard and foam (ottoman tutorial here).

I knit this ottoman cover for the cardboard ottoman base. Because there was so much space to cover and I wanted to be economical, I used Red Heart Super Saver yarn and used two strands worked as one to create a bulky yarn. To speed up the process, I only used the knit stitch in the pattern. The pattern can be found here.

Please let me know if you have any questions about the construction of the base or the cover! 
Isn't this nursery awesome!
I knit this matching pillow just for fun. :)

Saturday, April 25, 2015

DIY - Cardboard ottoman base tutorial


Hi everyone! A while back, I received a request from my friends for a pouf ottoman for their baby's room. I always love a challenge and was honored to help make something for their new arrival. I spent many a daydream thinking on how to best (and cheaply) construct a sturdy base for the ottoman. 

Luckily, I had a lightbulb moment and decided to roll up corrugated cardboard boxes to make the base. This proved to be an extremely sturdy and strong base. Click here to see a step-by-step tutorial of the process.

Then, I scored some half price foam at Joann for the cushioning. If desired, you could easily use an old blanket for the cushioning. Since I was knitting a cover for the ottoman and I did not want the foam to show through, I bought a dollar tree tablecloth to wrap around the ottoman. To see my knitting pattern, click here. Other finishing options include sewing a cover for this ottoman.

All ready for the baby!

Sunday, September 21, 2014

Monsters in Thrift Store Paintings

A while back, I stumbled upon this website that features monsters in thrift store paintings. I thought this concept was hilarious and immediately wanted to try it myself! I even google image searched "Monsters in thrift store paintings" for more inspiration.

I enlisted my artsy friend Erin in this venture and we lucked out and went to Salvation Army during their customer appreciation sale when everything in the store was 50% off! So Erin and I purchased our paintings and then spent the afternoon monster-fying them. 


"Autumn Picnic" - Monster by Heidi Arjes


"Untitled" - Monster by Erin Reinl


"I'm Hungry Too!" - Monster by Heidi Arjes


Sunday, April 6, 2014

DIY T-shirt Yarn Tutorial

Here is a quick post with an illustration on how to make T-shirt yarn for projects such as a T-shirt yarn rug, arm knit cowl, or - one of my next projects (spoiler alert) - this cat cave. The next time I cut a T-shirt into yarn, I will add step-by-step photos to accompany this cartoon. Enjoy!


Tuesday, February 18, 2014

Magic Mouse Slippers DIY

Is your magic mouse making TOO MUCH NOISE? Try this! 

We recently got two magic mice for the common computers in my lab. One mouse worked flawlessly but the other scraped against the desk, which was very annoying. Apparently sometimes the "feet" on the mouse do not allow enough space for the metal battery cover. One solution was to buy Fliders, or "slippers" for $10. I thought this was rather silly that after buying an expensive mouse, Apple will rake in ten more dollars because of a design flaw. C'mon!
So I looked through my desk drawer to try to find a DIY solution to this problem. I was able to literally put a bandaid on the problem. I cut a large fabric bandaid into strips as shown below and then stuck those strips on the mouse. Problem solved! 

If you are trying this, make sure you use a fabric bandaid as the plastic ones will not glide properly.
Steps: 1) Find magic mouse. 2) Clean rubber feet. 3) Cut the bandaid in strips that are the width of the rubber feet. 4) Attach the strips to the rubber feet. The scraping should be gone! If the noise is still present, repeat with another layer of bandaid strips.

Friday, October 18, 2013

Bicycle Basket on a Budget


Supplies:

Basket from dollar tree ($1.00)
Zip Ties (less than $3.00 for a pack of 50 at Wal-mart)


Directions:

Attach the basket to the handlebars of the bike with the zip ties. Put a sticker on the basket for additional character. :) Simple as that!


The story of a girl and her bike: 


I rescued this bicycle from my apartment's basement. It had been abandoned for years and after a tune-up and some new tire tubes, I was up and riding my "new" old bike. It sure has its quirks, it is not built for speed and it gives me a serious cardio workout whenever I have to go up hills. That said, it works great for getting me to work, softball and even the grocery store. Plus, I love the color and have gotten several compliments from kids and adults alike when I ride past.


Monday, October 14, 2013

Melted Crayon Art Tutorials

Crayon art made by dripping crayons through a hot glue gun onto canvas.
Supplies for crayon art.

Supplies needed:
  • Crayons (Crayola 64 pack - $3, Off brand - $1.75 at Dollar General)
  • Canvases - we used 11 by 14" (usually on sale for less than $10 for a 3 pack at Joanns
  • Hot glue gun - ($3 at Joann, if you put crayons through it, it will no longer work as a glue gun, so buy a separate one to devote to crayon art)
  • Acrylic paints (optional) - (less than $2 for a small bottle at Joann or Wal-Mart)
  • Paint brushes (optional)
  • Saw tooth hangers (~$2 for a pack of 7 at Joann)
  • A large box (to put your canvas in to avoid making a huge mess)
  • Round craft sticks (to shove the crayons through the glue gun)
Important note for putting crayons through this type of glue gun:
If you are going to shove crayons through the glue gun, it helps a lot to remove the trigger mechanism. To do this, you can unscrew the screws holding the glue gun together (make sure the glue gun is not plugged in when you do this!), separate the two halves, remove the trigger mechanism and then put the glue gun back together. We also used a round wooden craft stick to push the crayons through the glue gun. Be very careful, as the gun and wax get hot and unplug the glue gun when not in use! 


My first attempt at a similar project where I glued crayon bits to cardboard and then used a blowdrier to melt the crayons can be seen here. Again, I painted the canvases, this time in yellows and purples. To change it up a bit, I decided to insert crayons into the glue gun to melt them onto the canvas. I removed the paper from the crayons first and then shoved them through the gun. There was a learning curve with the glue gun and most of the splatters seen with the purple crayons disappeared once I removed the trigger mechanism from the glue gun (see note above).


Cara had a great idea for her project. She wanted to do something abstract with some geometric shapes and such. She used scotch tape (I think painters or masking tape would have worked better but I did not have either) to make the design on her canvas, and then melted crayons on top of the canvas using the hot glue gun. After that, she removed the tape (using an exacto knife to score the sides of the tape). I think it turned out very cool!


Kellee's project also turned out amazing! She first sketched the girl holding the umbrella onto the canvas and then taped on a cardboard barrier over the umbrella and paper over her design to prevent wax from dripping on the design. Then she layered on the melted crayons. After finishing with the crayons, she removed the paper and the cardboard and painted the girl and umbrella with acrylic paint. Good job, Kellee! :)


Laura wanted to try something different with her crayons art, so she melted the tips of the crayons and then used them like a brush to paint the wax onto her canvas. This provided her more control and made some very interesting blending effects. Way to be crafty!

For more melted crayon ideas and inspiration, click here.


To finish the artwork, I used super glue to attach a sawtooth hanger to the back of the canvases, ~3" from the top.