Showing posts with label kid crafts. Show all posts

Thursday, April 13, 2017

Resistor Headband DIY from T-shirt

There is only one week before the March for Science (it is on April 22, 2017) and if you are looking for a quick and easy design to make and wear in solidarity with Project Thinking Cap, this could be just the solution for you. Also, it is environmentally friendly, as you can upcycle an old T-shirt into a fabric headband. You can use acrylic paint or fabric paint to add on a design.

To learn more about my scientific research, why I am marching, and the Resistor Knit Hat I designed, check out this blog post: Resistor Knit Hat - March for Science.

Step 1. Find a T-shirt - I did not want to part with any of my blue or green T-shirts so I found one at a garage sale for $1. :)

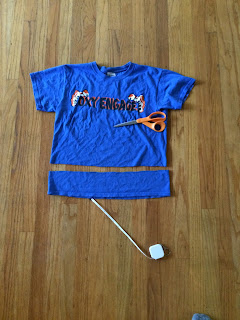
2. Cut T-shirt ~3 inches from bottom

3. Cut bottom seam from the strip.

4. Option 1: Cut the T-shirt so that it is ~1-2 inches shorter than the diameter of your head 
(mine is folded in half and was made for a 24 inch hat brim). 
Option 2 (not pictured): leave T-shirt strip original diameter, but cut to open up the strip. This will make a long strip of T-shirt that can be tied around your head ninja style. :)

5. Assemble paint - I used a white acrylic paint for the design. You can also use fabric paint (the puffy paint type). Tug the fabric a little laterally so that you can see which side of the fabric naturally folds under. You will want to paint on the side that does not fold under (so your head can keep the fabric flat). I am having trouble explaining this, so comment if it seems unclear. For my T-shirt, I ended up painting on the side that originally was the interior of the shirt.

6. Paint on desired design. I used a design showing a circuit with the symbols for a battery and two resistors.

 7. Let paint dry, then fold in half with the painted side in. Seam the edge with a sewing machine or by hand using a whip stitch.

Thursday, May 15, 2014

Handprint Art


This is another post about a project I helped make to decorate my mom's laundry room. I also made some Crocheted T-shirt Rugs and a Geometric Painting as well as sewing some colorful curtains. 

To be honest, if I cannot figure out what to give my mom for Christmas or a birthday (which happens A LOT), I decide to make something for her. This time I decided to employ my nieces to make a one-of-a-kind gift that will keep growing with our family.

Supplies needed:

  • Square canvases
  • Paint and paintbrush
  • Children

Step 1: Paint the canvas - I painted the front an off-white color and the sides brown.

Step 2: Carefully paint the kid's palm with the desired color

Step 3-4: Press the kids hand onto the canvas

Step 5: Let dry
Repeat step 2-5 if you want handprints that have 2 colors (as pictured above)

Paint on the name of the kid and the date if desired.


Friday, October 18, 2013

Bicycle Basket on a Budget


Supplies:

Basket from dollar tree ($1.00)
Zip Ties (less than $3.00 for a pack of 50 at Wal-mart)


Directions:

Attach the basket to the handlebars of the bike with the zip ties. Put a sticker on the basket for additional character. :) Simple as that!


The story of a girl and her bike: 


I rescued this bicycle from my apartment's basement. It had been abandoned for years and after a tune-up and some new tire tubes, I was up and riding my "new" old bike. It sure has its quirks, it is not built for speed and it gives me a serious cardio workout whenever I have to go up hills. That said, it works great for getting me to work, softball and even the grocery store. Plus, I love the color and have gotten several compliments from kids and adults alike when I ride past.


Sunday, June 30, 2013

Transparency Film Art

Remember the Petri Dish Art that I made with microbiology lab supplies? Similar results can also be obtained with everyday household objects.


Supplies needed:
Transparency film
Permanent markers
Rubbing alcohol

Directions:
Draw on the transparency film with permanent markers in your color(s) of choice. Drop, splash, splatter, or dab rubbing alcohol on the film and let dry. Tape to white paper and hang on a wall. The film can also be hung on a window. This project is perfect for kids old enough to use permanent markers.
A worthy addition to the art on my boss's door.

Thursday, June 20, 2013

Petri Dish Art

I work in a microbiology lab and I decided to make some petri dish art in between experiments last week.

Using permanent markers, I filled the bottom of the petri dish with color as best I could. I then dropped isopropanol (rubbing alcohol) onto the petri dish and waited for the drops to evaporate, making cool patterns.

This could be done at home with empty lids, permanent markers, and rubbing alcohol. You can drop the alcohol in ordered drops or splatter it  to make different patterns.

To put the finishing touches on this art project, I glued the lids on the petri dishes using my hot glue gun. I then glued ribbons on so that I can hang the art up in my window. This was a great way to spend a little downtime in lab. :)

Procrastination at its finest. 
I call this one "Starry Plate"


Finished products.