To learn more about my scientific research, why I am marching, and the Resistor Knit Hat I designed, check out this blog post: Resistor Knit Hat - March for Science.
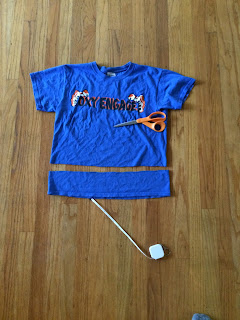
Step 1. Find a T-shirt - I did not want to part with any of my blue or green T-shirts so I found one at a garage sale for $1. :)
2. Cut T-shirt ~3 inches from bottom
3. Cut bottom seam from the strip.
4. Option 1: Cut the T-shirt so that it is ~1-2 inches shorter than the diameter of your head
(mine is folded in half and was made for a 24 inch hat brim).
Option 2 (not pictured): leave T-shirt strip original diameter, but cut to open up the strip. This will make a long strip of T-shirt that can be tied around your head ninja style. :)
5. Assemble paint - I used a white acrylic paint for the design. You can also use fabric paint (the puffy paint type). Tug the fabric a little laterally so that you can see which side of the fabric naturally folds under. You will want to paint on the side that does not fold under (so your head can keep the fabric flat). I am having trouble explaining this, so comment if it seems unclear. For my T-shirt, I ended up painting on the side that originally was the interior of the shirt.
6. Paint on desired design. I used a design showing a circuit with the symbols for a battery and two resistors.
7. Let paint dry, then fold in half with the painted side in. Seam the edge with a sewing machine or by hand using a whip stitch.


nice
ReplyDeleteGreat idea. So consistent with our theme.
ReplyDelete