Showing posts with label craftivism. Show all posts

Saturday, March 31, 2018

WeDoNotAgree.org - the Etsy of the Resistance


Tuesday, March 6, 2018

Evil Eye Gloves - Crochet Version


Krista Suh's newest craftivist movement is to create a sea of eyes at the March for our Lives to show congress we are watching and we are holding them accountable. She is organizing the effort to collect gloves in Washington, DC. Check out her website here to see where to send the gloves.

Help create a Sea of Eyes at the March for Our Lives
Source: http://kristasuh.com/evil-eye-glove/
I was immediately on board and I designed my own knit colorwork version (see it here). I challenged my friend Silke, the most talented crochet designer I know, to design a crocheted pair of gloves. She did not disappoint and came up with these awesome gloves. These glove are not simply an eye appliquéd onto simple gloves, they are just one layer throughout. She enlisted her friend Stefanie to help her write up the pattern. Stefanie originally created the pattern in German and then translated it to English. Check out more of Stefanie's designs here: http://kreativmittaeschwerk.blogspot.com/ They gave me permission to put the English pattern on my website and I am honored to help share it with everyone.

GET THE PATTERN HERE> Click here to download the pattern. Click here to see the original German version of the pattern.

This pattern is very thorough and has step-by-step instructions so hopefully even beginning crocheters can make it. Comment below if you have any questions about the pattern and I'll run them by Silke and Stefanie.

This crochet eye could also be sewn onto simple knit or crochet fingerless gloves.

Silke modeling her gloves.


Wednesday, February 21, 2018

Evil Eye Gloves


This week, Krista Suh (the Pussyhat Project creator) launched her next craftivism project. Just like she created a "sea of pink" for the Women's March, she wants to create a "sea of eyes" at the 2018 March for our Lives. She enlisted Kat Coyle (Pussyhat original designer) to design knit fingerless gloves with eyes embroidered into the palm. These eyes will show those in power that we are watching them and we will hold them accountable for their actions. Krista is leading the effort to have gloves sent to DC to support the students that will be marching. Her initial goal is 438 pairs of gloves - one pair to represent each person killed or injured in school shootings from 2014-present. I like to imagine these gloves giving representation to the victims, a symbolic gesture that the victims are present and watching in spirit. Please take the time to check out Krista's webpage for the original evil eye glove pattern and more details about the project and where to send gloves in DC (http://kristasuh.com/evil-eye-glove/).

Click here to get a pdf of my pattern. I designed my gloves in the round version of the Evil Eye Mitts using stranded colorwork to add the eye design.  If you have any questions about the pattern or find a mistake, please let me know!

Per Krista's request please share your projects using these hashtags on social media: #evileyegloves #marchforourlives

I had a request for a chart with the thumb gusset directions included. Here it is with the thumb gusset directions in words to the right for the 32 stitch cast on. The thick lines indicate where I would place stitch markers if using magic loop:

Here it is without lashes - (for the 32 stitch cast on):


Wednesday, November 29, 2017

P*ssyHat by Craftimism

My friend Lala modeling her hat
Okay, okay, so I know I am about a year late to the game posting about the Pussyhat Project. I had heard of the movement before the Women's March last year, but I did not contribute any hats in time for the march. Instead, I made this awesome knit uterus hat for my friend Erin and liked it so much I made one for myself! In February, my uncle requested a "Pussy Hat" for my aunt and I finally made my first Pink Pussyhat! I used the dimensions from the "official" pattern but adjusted it to be knit in the round and my looser gauge. After that, I made another Pussyhat for my friend Lala and I made a few variations of pussy hats for people going to the science march. A printer-friendly version of my pattern can be found here.


Saturday, August 12, 2017

Black Lives Matter Knit Hat (#BLM)

There was a white supremacy rally in Charlottesville, Virginia last night. I was disgusted when I heard about it this morning. This cannot and should not be allowed and we need to stand against hate and stand for the equality of all people.

I designed a Black Lives Matter hat a while back and have been wearing it in public for the last few weeks. The events of last night gave me the spur of energy needed to finish writing the pattern.

Also, I included instructions for altering the hat to fit afros. I have very flat hair and my hat designs typically fit those with flatter hair perfectly, but I have not done a good job altering my designs to be inclusive for those with different hair styles. Here are my suggestions for altering this hat as well as any of my other designs to be suitable with afros. Please contact me if you have any other suggestions or guidelines for designing hats for people of color as I had a hard time finding resources for this online and had to consult some friends for advice.

Notes for altering beanie hat designs to accomodate afros: To make a hat that can accomodate an afro where all the hair is shoved into the hat, as a general rule, add 1 inch to the hat (before decreasing) for every 3 inches of afro. The ribbing will need to be tight enough to stay on and you may consider sewing some stretchy satin to the brim. If the wearer intends to wear the hat over an afro with the hair down, the hat should be made wider rather than taller and 1-2 black stitches could be added to one side of each repeat.

Click here to get a printer-friendly pdf of this Black Lives Matter Knit Hat pattern.

Saturday, July 29, 2017

Cafe Zoë fundraiser for Willow Oaks Elementary School

Kathleen Daly and her daughter Zoë Sharkey
Source: Cafe Zoë's facebook page
Today I would like to showcase a fundraiser that is ongoing through the end of August at Cafe Zoë, my local cafe.

Cafe Zoë regularly runs fundraisers to provide Willow Oaks Elementary with needed items. Willow Oaks is part of the Ravenswood School District, which, from what I can gather, was the victim of some unfortunate rezoning over 25 years ago after the completion of Highway 101. It appears that some of the more middle class neighborhoods "opted" to join the Menlo Park City School Disctrict (source). Willow Oaks Elementary in particular, was pretty much abandoned by the neighboring communities, whose members must send their kids to schools that are farther away than the elementary school nestled in their neighborhood.

Cafe Zoë is a neighborhood cafe run by Kathleen Daly and it's my regular blogging and knitting pattern writing hangout. Daly has a huge heart and has, along with the patrons of her cafe, adopted Willow Oaks to raise money for items the school needs. In the past, the successful fundraising campaigns have purchased spare school uniforms and choral risers for the children. The current fundraiser is providing art tables to the school. Daly says some of the students are rewarded for good behavior by being able to make artistic creations on posterboard. Currently, the art teacher must push together small desks to make do as the school does not have art tables.
A map showing the communities that "opted" out
of the Ravenswood school district (source)

Daly's daughter, Zoë Sharkey, who manages events took the lead on this fundraiser and recruited local artists (including myself) to donate items to the fundraiser. The artists are displaying their art in the cafe through the end of August and a portion of any art sold will be donated to Willow Oaks. The artworks can be viewed in an album here. If anyone would like to help out with the fundraiser or purchase art, they can contact Cafe Zoë directly here. Cafe Zoë is almost halfway to its goal for the fundraiser and hopes to purchase four art tables for the school.
Craftimism's "Politiknits" items for sale at the Cafe Zoë fundraiser - earrings, pins/magnets, and coffee sleeves

To learn more about Cafe Zoë, check out their website here: http://www.cafezoehub.com/contact/

Here are a subset of the donated works of art: (click here to view all donated art in an album)


Wednesday, May 31, 2017

Simple Knit and Crochet Heart patterns


I designed these knit hearts to be used as a symbol of love and hope after hearing about the tragic Max attack in Portland that inspired the #hearts4PDX effort in 2017. A friend of mine designed a simple crochet heart as well (found at the bottom of this page).

Garter stitch heart
© Heidi Arjes, 2017. This pattern is for personal use only. Commercial use without written permission of the author is prohibited.
Directions:
You can use the yarn and needles of your choice. I used worsted weight yarn and needles so that the finished product would be loose (I'd imagine size 8 will work for most knitters). Gauge is not super important.

Cast on 10 Stitches
Row 1-8: Knit
Row 9: K2tog K8 (9 stitches on needle)
Row 10: K2tog K7 (8 stitches on needle)
Row 11: K2tog K6 (7 stitches on needle)
Row 12: K2tog K5 (6 stitches on needle)
Row 13: K2tog K4 (5 stitches on needle)
Row 14: K2tog K3 (4 stitches on needle)
Row 15: K2tog K2 (3 stitches on needle)
Row 16: K2tog K1 (2 stitches on needle)
Row 17: K2tog (1 stitches on needle)

Cut yarn and pull needle to pull the end through the final stitch. Pull tight.

Finishing:
Cut yarn to ~10 inch length. Use yarn needle or crochet hook to pull yarn through center of heart. Tie on the top to create the top bumps of the heart. When you are happy with the shape, tie a tight square knot at the top of the heart and then tie the top of the strings so it can be hung up. I used the yarn needle to stitch the cast on tail down to the cast off tail and I tied those. You can leave the tails long as a tassel, trim them, or weave the ends into the heart.
Off the needles, the heart is not yet a heart.

String yarn through the heart as shown.


Tie the yarn tightly at the top to make the heart shape.

Stockinette in the round heart
© Heidi Arjes, 2017. This pattern is for personal use only. Commercial use without written permission of the author is prohibited.
Directions:
You can use the yarn and double pointed needles of your choice. I used worsted weight yarn and needles so that the finished product would be loose (I'd imagine size 8 will work for most knitters). Gauge is not super important.


Cast on 20 Stitches, divide to two needles, 10 stitches per needle
Join to knit in the round
Round 1-6: Knit
Round 7: *K2tog K8* repeat twice
Round 8: *K2tog K7*
Round 9: *K2tog K6*
Round 10: *K2tog K5*
Round 11: *K2tog K4*
Round 12: *K2tog K3*
Round 13: *K2tog K2*
Round 14: *K2tog K1*
Round 15: *K2tog*
Round 16: K2tog

Cut yarn and pull needle to pull the end through the final stitch. Pull tight.

Finishing:
Use the cast on tail and yarn needle to whip stitch the top closed. Cut yarn to ~10 inch length. Use yarn needle or crochet hook to pull yarn through center of heart. Tie on the top to create the top bumps of the heart. When you are happy with the shape, tie a tight square knot at the top of the heart and then tie the top of the strings so it can be hung up. I used the yarn needle to stitch the cast on tail down to the cast off tail and I tied those. You can leave the tails long as a tassel, trim them, or weave the ends into the heart.

Crochet Heart by Silke Pflueger
©craftimism, 2017. This pattern is for personal use only. Commercial use without written permission is prohibited.


Magic circle
1st round: 6 sc in magic circle, close with slip stitch
2nd round: 2 sc in every sc of round 1 for total of twelve sc, close with slip stitch
3rd round: sc, hdc, 3 dc in first sc; dc, hdc in next stitch; sc in each of next three stitches; hdc, dc in next stitch, top with two chains and slip stitch in "belly" of first chain; dc, hdc in next stitch; hdc, dc in next stitch; 3 dc, hdc, sc in last stitch; close with a slip stitch somewhere below to give it more heart definition.
If you like the ones with the hole in the middle start with round 2.

Thursday, April 13, 2017

Resistor Headband DIY from T-shirt

There is only one week before the March for Science (it is on April 22, 2017) and if you are looking for a quick and easy design to make and wear in solidarity with Project Thinking Cap, this could be just the solution for you. Also, it is environmentally friendly, as you can upcycle an old T-shirt into a fabric headband. You can use acrylic paint or fabric paint to add on a design.

To learn more about my scientific research, why I am marching, and the Resistor Knit Hat I designed, check out this blog post: Resistor Knit Hat - March for Science.

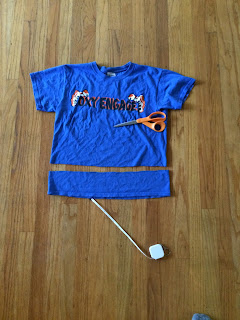
Step 1. Find a T-shirt - I did not want to part with any of my blue or green T-shirts so I found one at a garage sale for $1. :)

2. Cut T-shirt ~3 inches from bottom

3. Cut bottom seam from the strip.

4. Option 1: Cut the T-shirt so that it is ~1-2 inches shorter than the diameter of your head 
(mine is folded in half and was made for a 24 inch hat brim). 
Option 2 (not pictured): leave T-shirt strip original diameter, but cut to open up the strip. This will make a long strip of T-shirt that can be tied around your head ninja style. :)

5. Assemble paint - I used a white acrylic paint for the design. You can also use fabric paint (the puffy paint type). Tug the fabric a little laterally so that you can see which side of the fabric naturally folds under. You will want to paint on the side that does not fold under (so your head can keep the fabric flat). I am having trouble explaining this, so comment if it seems unclear. For my T-shirt, I ended up painting on the side that originally was the interior of the shirt.

6. Paint on desired design. I used a design showing a circuit with the symbols for a battery and two resistors.

 7. Let paint dry, then fold in half with the painted side in. Seam the edge with a sewing machine or by hand using a whip stitch.