Remember the Petri Dish Art that I made with microbiology lab supplies? Similar results can also be obtained with everyday household objects.
Supplies needed:
Transparency film
Permanent markers
Rubbing alcohol
Directions:
Draw on the transparency film with permanent markers in your color(s) of choice. Drop, splash, splatter, or dab rubbing alcohol on the film and let dry. Tape to white paper and hang on a wall. The film can also be hung on a window. This project is perfect for kids old enough to use permanent markers.
Welcome to the third Doctor Who themed project in my blog! Doctor Who fans should also check out my Amy Pond Police Outfit and my Exploding Tardis Painting tutorials. I have at least one more Doctor Who post up my sleeve as well but with the wibbly-wobbly timey-wimey, who knows when it will get published :).
These legwarmers were a gift for my friend who introduced me to Doctor Who. In the winter during knitting and netflix seasons, I finished so many hats and knitting projects while devouring episodes of this awesome show.
"The universe is big. It's vast and complicated and ridiculous. And sometimes—very rarely—impossible things just happen and we call them miracles." -The Doctor ('The Pandorica Opens') "The future pivots around you. Here. Now. So do good. For humanity. And for Earth." -The Doctor ('Cold Blood').
The fabric paint I used to paint
the "POLICE BOX" lettering.
I work in a microbiology lab and I decided to make some petri dish art in between experiments last week.
Using permanent markers, I filled the bottom of the petri dish with color as best I could. I then dropped isopropanol (rubbing alcohol) onto the petri dish and waited for the drops to evaporate, making cool patterns.
This could be done at home with empty lids, permanent markers, and rubbing alcohol. You can drop the alcohol in ordered drops or splatter it to make different patterns.
To put the finishing touches on this art project, I glued the lids on the petri dishes using my hot glue gun. I then glued ribbons on so that I can hang the art up in my window. This was a great way to spend a little downtime in lab. :)
I knit this hat for a friend and colleague, Daniel Haeusser. Daniel studies bacterial cell division and is also interested in teaching. He is an associate blogger on one of my favorite science blogs that explores the fascinating microscopic world, Small Things Considered. To learn a little bit more about him and his work, you can read his Small Things Considered bio here. Not to brag (well, actually to brag), he encouraged me to write this article for that blog about bacterial biofilms.
My niece and I posing with the penguins at the zoo
Anyway, back to the point. Aside from science, Daniel loves penguins. I believe he even mentioned that his wedding was penguin themed. Before last Christmas, Daniel asked me to knit a hat for his 2-year-old niece. He said a polar bear hat would be okay, but he would really like a pengin hat, if possible. I am always up for a challenge and am the type of knitter that usually doesn't like to make the same thing more than once (excluding some of my favorite slipper patterns). I also love penguins, especially those at the Saint Louis Zoo! The Penguin Parades (Sunday at 2:00 when the temperature is below 40°F) is one of the cutest and most fun winter activities in the city (see the video below). But I digress, back to the hat details. I searched the internet and could not find any existing penguin knit hat patterns that I absolutely loved, so I took inspiration from the pictures of this penguin beanie and this hat to design the pattern for my Penguin Knit Hat.
The pattern for this hat can be found here, information about the pattern is here and a tutorial for embroidering on the eyes can be found here. I employed some creative knitting techniques to switch between the white and black yarn. I have detailed instructions and pictures on how to do this on the pattern. If you have any questions or need clarification on the pattern, feel free to contact me.
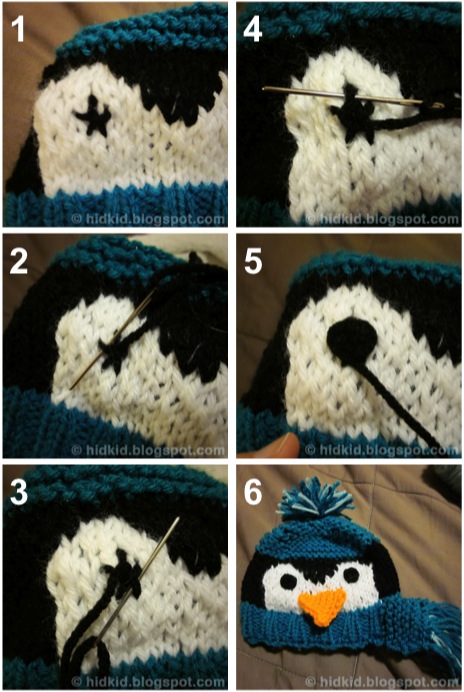
Here is a tutorial about how to embroider eyes. This is how I made the eyes on the Elmo and Cookie Monster Hats, the Polar Bear Hat, and the Penguin Hat (coming soon!).
Start with a long piece of yarn (at least a few feet, maybe longer)
1. Sew a five-sided star the size of the finished eye.
2-3. Weave the long tail of yarn over one star point and under the next.
4-5. Continue around until the eye looks like a circle and the star points are full. Tie the yarn in the back of the work and weave in the end.
6. Repeat for the second eye. Ta-da! A circular embroidered eye looks great on this Penguin Hat.